TWiki . Mill0405 . Assignments

amorphous ornament

Introduction | Schedule | Assignments | Readings | Participants | Download | Millcam | Links


LightShade - 48 hour research/design assignment.

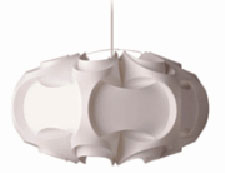
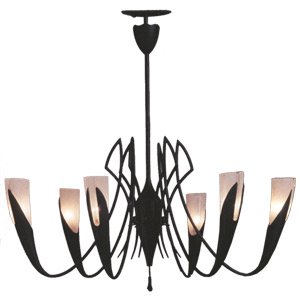
The assignment is to create a new "pendant" (hanging) type lighting fixture.

Each of the lights is intended to hang and illuminate the ceiling immediately around it. The design for the light shade should find its language in a specific pattern MODE and STYLE of ornament, and should make immediate reference to the individual characteristics, rules and logic of that style.

pendant.jpg
cache1.jpg Pattern Modes:
- Unitary
- Additive
- Repeating
- Hypotactic

Ornamental Styles
- Religious or mythological
- Representational
- Ceremonial
- Cultural
- Historical
- Regional

Once a style has been chosen each participant will be expected to analyze and deconstruct the logic behind the ornament. The participant is then asked to use the analysis to design a LightShade? that reflect both an understanding of the ornamental logic and an understanding of the spatial relationship between illumination and surface topology.

This fast introduction assignment has two goals:

- First - to promote the research of ornamental styles and give the student a "style guideline" for the rest of the project,

- Second - to give the student their first piece of the design puzzle that will be the main work for the diplomwahlfacharbiet.

chandelier.jpg
shop.jpg

Each student will be provided with:

- a socket,
- a lightbulb,
- and electrical cable.
Other materials are to be used at the discretion and cost of the student.
All materials in the milling lab are available subject to approval.

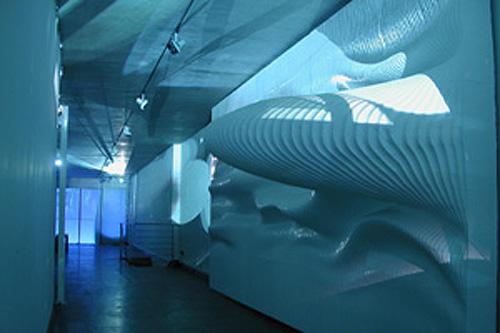
The lights and the patterns of light and shade that they reflect will be used to illuminate designed ornamental ceiling surfaces in the main work of the diplomwahlfach arbeit.

Consideration should be taken upon issues of reflection, shadows, spacing, geometry, position, pattern, direct and indirect lighting.

wirelite.jpg
Bleb.jpg Each participant will be required to present 6 images of their chosen style, explain the styles fundamental logical rules, the use of motifs, and the organization of patterning with relation to the crated light.

Deliverables:
1 short presentation
1 functioning "pendant" light.

Presentation Wednesday Feb 09, 1400


window_mount.jpg Assignment 2a) PRESENTATION SCREEN

Assignment 2 will make a presentation screen for the ornament blocks from the first assignment.
For this project we will attempt to use the Laser cutter at Technopark.
It can cut thin metal sheet, plastic sheet, and thin wood or cardboard.

The final product should display the blocks in a novel, interesting, and appropriate way. The mounting system can take advantage of the windows in the PC lab (143x264 cm) but this is not specifically required.

The goal of this assignment is to demonstrate the possibilities and limitations of this second form of CNC production, and to get you thinking about the act of making 3d strucures out of 2d cuttings. Concepts to explore are folding, bending, perforation, intersections, and of course the final ornamented aesthetic of the project.

Deliverables for Wednesday Dec 8th are drawings, sketches, 3d models, or digital files,... whatever you need to communicate your idea.

The final project will be a group work, and should be able to be produced in one day.

Groups
Design:
Vanessa Borkmann, Christina Ritigelman, Caroline Ting, Jörg Hillesheim

Fabrication:
Felix Siegrist, Johann Reble, Carolina Mojto, Dominique Meier, Jonas Grob

Organization:
Mathias Bernhard, Ingmar Kurtz, Simone Renfer, Anna Flueckiger


  Assignment 1c) Parametric Programming

The third part of assignment 1 is to begin programming with MEL to create surfaces.

1. Examine the 3 surfaces you have already milled.
2. Identify a “unique characteristic” from the surface:
- a pattern in the layers of plywood
- look for a motif, pattern, or ornamental feature
- a pattern that is a result of the geometry & the material
- some unique identifying aesthetic characteristic that can be used as part of a overall design
3. Analyze the feature and determine how to recreate its geometry or features
4. Experiment with MEL and MAYA to determine how to PROGRAM the characteristics onto a surface
5. Refine your program using logical statements and variables.
6. Turn your script into a PROCEDURE
7. Execute the procedure a number of times to create the final set of surfaces to be milled.
8 Process the surfaces using SurfCAM?
9 Mill the surfaces.

The goal for this assignment is to make the translation of a modeled surface, into a programmed surface and get you familiar with making a MEL – Procedure.
The final product of the complete assignment 1 (a, b, & c) should be a set 12 milled surfaces. With 9 of the surfaces being generated from a single MEL code.
The surfaces and scripts are DUE for presentation on Dec 1 in the milling lab. At this time each student will also present their MEL script and demonstrate how it works to create the ornamented-milled surfaces.


  Assignment 1b) SURFCAM: Processing a surface

The second assignment is to process one of your MAYA surfaces and get it ready for the CNC mill.


1. Choose a surface that doesn't have any UNDERCUTS

2. Subdivide the surface IN MAYA using the detach surfaces tool

2. Export the surface to surfCAM

3. Process the surface with both Rough and fine cuts.

3. Post and save the G-code


The goal for this assignment is to get familiar with SurfCAM? and preparing surface forms for output to the mill.

The final product of the assignment should be a set opf G-code files for the Precix 3 axis CNC mill.

The results from this assignment are DUE for the morning workshop on Nov 3, and are required to proceed on to the third part of the assignment.


primitive.jpg
Assignment 1a) Maya: Learn by Playing

The first assignment is to simply get on the MAYA software and try to make some surfaces.
There are 3 specific ways to create a NURBS surface:

1. Create > NURBS Primitives > Plane


2. Create a series of lines or splines, then use the "LOFT" tool to generate a surface


3. Create a set of parallel and connected lines (splines / rails) and use the "BI-RAIL" tool to generate a surface


The goal for this assignment is to get familiar with MAYA and creating surface forms.

The final product of the assignment should be at minimum 3 different surface geometries that have been create using one of each of the above methods.

The results from this assignment are DUE for the morning workshop on Oct 29, and are required to proceed on to the second assignment 1b).

loft.jpg
birail.jpg


There will be 3 assignment for this course:

Assignment 1.
Skill building in Maya and "SurfCAM"

Assignment 2.
Preliminary investigation and experimentations with engraving,
patterning, and assembly of componants on an irregular surface.

Diplomwahfacharbeit - Assignment 3.
Final design project
- Programmed
- Parametric
- Fabricated
- Exhibition display
- Ornament

----- Revision r1.9 - 07 Feb 2005 - 08:35 - RussellLoveridge
Copyright © 1999-2003 by the contributing authors. All material on this collaboration platform is the property of the contributing authors.

This website has been archived and is no longer maintained.