Perad is an interface for the rendering program Radiance written at the Chair for Architecture & CAAD, by Daniel von Lucius. It is a stand-alone program.
Exporting a model from MicroStation
- where
- File > Export > Radiance or fake.space > node6 >

- what
- Select one of the above options. In the lower left status area of MicroStation, this message will be displayed: "Export Radiance > Click in a window, wait until export is finished". Click in any window. When the export is complete, a message box will appear saying that the export is complete and Perad will start.
Perad (version 1.0a)
- what
- Perad will start with the exported model from MicroStation loaded in it.
If you want to run Perad without exporting a model from MicroStation, you should start it from the unix shell.
- where
- Shell window
- how
- Toolchest > Open Unix Shell
In the shell, go to the directory of your radiance files. eg:
cd /homes10/spaceXXX/node5/filename_radTo start Perad with the model loaded in it, type:
perad -f projectname.prj
Main components of Perad
- where
- The selection menu of the main components is at the top right corner of the window.
- what
- The main components are:
- General
- Objects
- Materials
- Views
- Images
It is essential to have a view defined when you want to render, therefore, it is good to start the whole process by defining a viewpoint. There are no viewpoints defined for models exported from MicroStation. For this, you have to go to the Views component first.
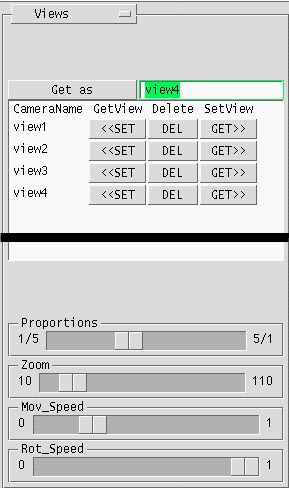
Views
-
- where
- Select the Views option from the selection menu in the upper right corner.
- how
- Navigation is done using the middle mouse button (free rotation), and in combination with the Ctrl (tracking), Alt (rotation around the viewing axis), and Shift (pan)keys.
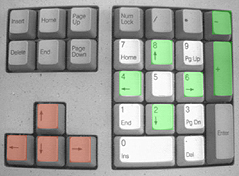
Another way of navigating is by using these keys:
The left group of keys is used to rotate the camera around the eye point in the respective direction.
The right group of keys is used to shift the camera perpendicular to the axis between the eye point and the target point in the respective direction.Get as button is used to create a new view. The name of the view should be typed in the text field next to this button before pressing this button.
The views are listed in the middle part of this panel. CameraName is the name of the view given by the user. The set button displays this view in the main display area of the window. The delete button deletes the view. The get button saves the current view displayed in the main display area of the window into the specified view. If you use get, the old view is overwritten by the new one.
The Proportions slider changes the proportions of the main display area. The rendered image of a view will have the proportions of the main display area.
The Zoom slider decreases (zoom in) or increases (zoom out) the portion of the model displayed in a view.
The Mov_speed slider decreases or increases the speed of camera movement.
The Rot_speed slider decreases or increases the speed of camera rotation.
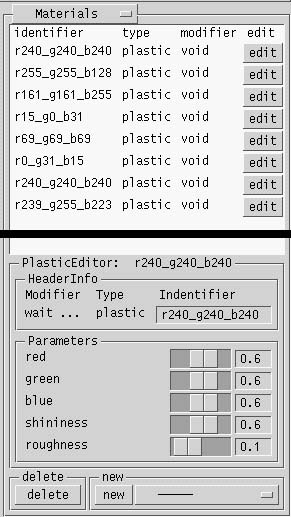
Materials
-
- where
- Select the Materials option from the selection menu in the upper right corner.
- how
- The existing materials are listed in the control panel.
Each material name is constructed from its color values (red, green, blue)
specified in MicroStation. If there are materials defined in MicroStation, they will be exported to Radiance with their given names. All materials are exported as of type plastic.
In Perad, next to each material, there's an edit button to edit its properties. The options for each material are different.
Currently, Perad supports five materials:
- light This is an undirected light source. The options that can be set are intensity (how strong the light is), red, green and blue (the color of the light).
- spotlight This is a directed light source. The options that can be set are intensity (how strong the light is), red, green and blue (the color of the light), angle (between 0 and 180), Xdir, Ydir, and Zdir.
- metal This is a material with high specular reflection value. The options that can be set are red, green, blue (the color of the material), shininess, and roughness.
- plastic This is a regular diffuse material. The options that can be set are red, green, blue (the color of the material), shininess, and roughness.
- trans This is a transparent material, eg. glass. The options that can be set are red, green, blue (the color of the material), shininess, roughness, transmissivity (how much light it lets to go through it), and trans specularity. If the roughness value is set greater than ~0.05, the material will hardly look transparent.
In the HeaderInfo section, you can rename the material by typing in the text field under the identifier label.
The lowest part has two sections; where you can delete the current material that is displayed in the editor section, and where you can create new materials. There is a selection menu where you will find all the supported materials. After you make your selection, you can press the new button to create a new material.
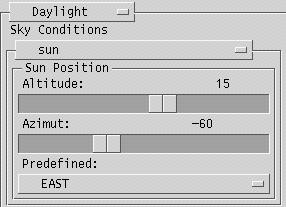
Daylight
- where
- Select the Materials option from the selection menu in the upper right corner.
- how
The interface includes some predefined Sky Conditions which are reflected in the background color of the main display area.
The position of the sun can be adjusted interactively or by selecting one of the predefined positions.
The Altitude slider changes the altitude of the sun.
The Azimuth slider changes the azimuth angle of the sun.

Objects
- where
- Select the Objects option from the selection menu in the upper right corner.
- how
- The existing objects are listed in the control panel.
Each object name is constructed from its color values (red, green, blue)
specified in MicroStation.
All entities of the same color in the MicroStation model are exported to Radiance as
one object.
Next to each object is a selection menu with the materials defined inside the project. You can select the material that you want to assign to this object, and the object will be displayed with its new material in the main display section of the window.
You cannot edit or add objects in Perad. If you want to change the geometry, you need to re-export the model.
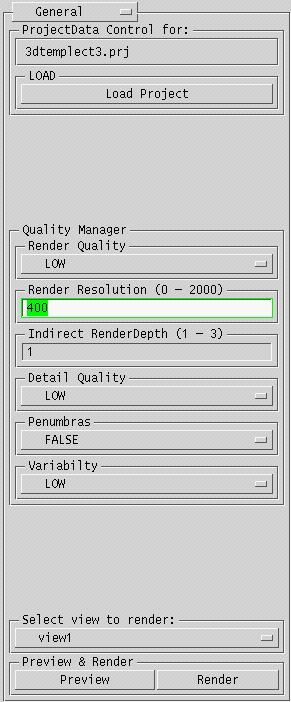
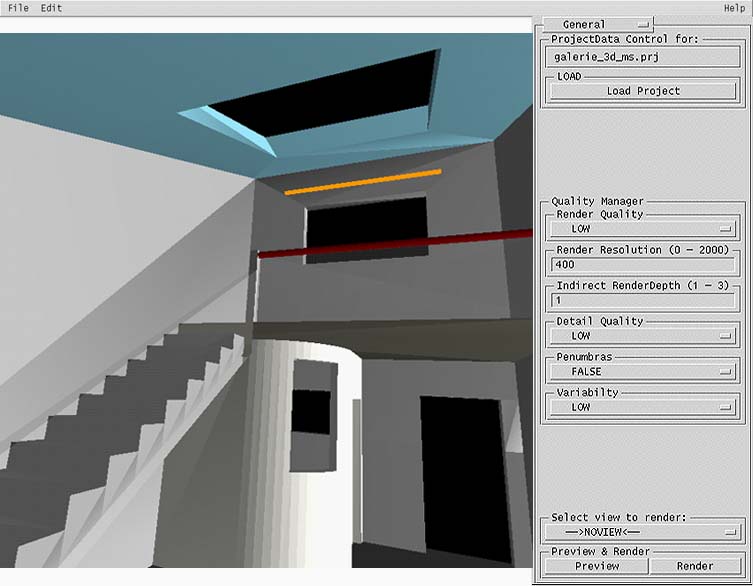
General
- where
- Select the General option from the selection menu in the upper right corner.
- how
- The ProjectData Control section displays the path to the project directory,
and the name of the project. The Load Project button brings up a file selection
dialog to load a project. The project is saved when the user makes a preview rendering.
The Quality Manager section contains options to control the quality and resolution of the renderings. Low quality renderings do not give very good results, but the computation time is very short. High quality renderings take longer to compute.
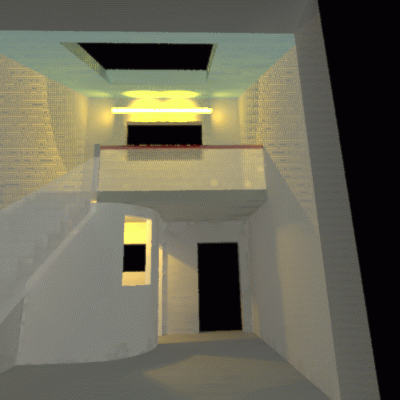
The Preview & Render section has options to render and preview. The preview button saves the project and starts the radiance preview window. The render button saves the project and renders the view selected in a seperate process. This process runs independent of the interface, even if the user logs out of the machine. The result of this process is an image with .pic extension, a special Radiance format. The selection menu displays a list of the saved views to select for rendering. If there is no view selected, rendering is not possible.

Images
- where
- Select the Images option from the selection menu in the upper right corner.
- how
- The images resulting from a rendering are in pic format and are displayed in a
program called ImageView. To be able to view these images in an ordinary image
processing program, we need to convert them to another format. In the Select & Save
section of the control panel, a .pic file can be selected and viewed. The image should be saved to the
projectname.img directory to be converted, using the button Save to projectname.img.
In the Convert & ViewTiff section, there is a slider to change the exposure value (lightness, darkness) of the image. The image can be selected from the selection menu, and either only converted to tiff format, or converted and opened in xv. When the image is opened in xv, it can be saved as gif or jpg to upload to the Web.
This website has been archived and is no longer maintained.