 Kapitel
9
Kapitel
9
Inventor
I - From AutoCAD to Inventor and C++
lecture
With Inventor it is possible to write programs that take advantage of fast
graphics. Inventor is based on OpenGL (Open Graphics Language), which will be
available on many platforms. OpenGL is replacing the older GL, which was faster
and easier to program, but was only available on Silicon Graphic Machines.
Inventor too will be available on other platforms and therefor the programs you
write will be portable. Inventor writes iv-files, which format is similar to
the upcoming standardised format for VRML (Virtual Reality Markup Language). To
know Inventor means to be ready for fast graphics programming and be able to
create world-wide accessible virtual reality models.
Lets start from what we know and approach Inventor and C++ programming
step-by-step:
Different CAD-Programs store the description of objects in different ways.
Often the drawing files of one CAD program cannot be opened with another CAD
program. Some standardised file formats had to be established, file formats
that can be written by one program and read by another, to enable the user to
transport a model into a different environment.
Several formats exist, important ones are:
- dxf, originates from AutoDESK/AutoCAD, but is now used by many others too.
- STEP, standard for the exchange of product model data, a draft standard
defined by ISO (International Standard Organisation).
- IGES (Initial Graphics Exchange Specification) is an ANSI (American
national standard) standard, a neutral format widely used for big systems,
similar importance as STEP.
A translator is a program or procedure, that
can write the data from a program in a specific file format, similar to
translating from one language to another. Sometimes a translator can not
translate every information into an other format. For example solids from
AutoCAD often get translated into wire frame objects, if the desired format has
no notion of a solid. A translated representation is often complex, because the
translator cannot recognise that special shapes and features could be
formulated in a simpler way.
iv is the standard file format for exchanging 3D data among applications
defined by Inventor. Compared to dxf it is easy to read and modify. Scenes for
Inventor could be written directly as iv-files, which might be the reason for
basing VRML on this format.
AutoCAD-cube:
	( (-1 . <Entity name: 600003cc>)
	  (0 . "POLYLINE")
	  (8 . "0")
	  (66 . 1)
	  (10 0.0 0.0 0.0)
	  (5 . "2D")
	  (70 . 16)
	  (40 . 0.0)
	  (41 . 0.0)
	  (210 0.0 0.0 1.0)
	  (71 . 6)
	  (72 . 3)
	  (73 . 0)
	  (74 . 0)
	  (75 . 0)
	)
iv-cube:
	Separator {
	    Cube {
		width   1
		height  1
		depth   1
	    }
	}
Translation to iv:
	Separator {
	    Label {
		label "group0"
		}
	    Separator {
		Coordinate3 {
		    point	[ 1 0 1,
			  0 0 1,
			  0 0 0,
			  1 0 0,
			  0 1 1,
			  0 1 0,
			  1 1 1,
			  1 1 0 ]
		}
		ShapeHints {
		    vertexOrdering COUNTERCLOCKWISE
		    shapeType      SOLID
		    faceType       UNKNOWN_FACE_TYPE
		}
		Normal {
		    vector	[ 0 -1  0,
				 -1  0  0,
				  0  1  0,
				  0  0  -1,
				  1  0  0,
				  0  0  1 ]
		}
		NormalBinding {
		    value   PER_VERTEX_INDEXED
		}
		IndexedFaceSet {
		    coordIndex
		[ 0, 1, 2, 3, -1, 1, 4, 5,
		  2, -1, 4, 6, 7, 5, -1, 5,
		  7, 3, 2, -1, 7, 6, 0, 3,
		 -1, 6, 4, 1, 0, -1 ]
		    normalIndex
		[ 0, 0, 0, 0, -1, 1, 1, 1,
			  1, -1, 2, 2, 2, 2, -1, 3,
		  3, 3, 3, -1, 4, 4, 4, 4,
		 -1, 5, 5, 5, 5, -1 ]
		}
	    }
	}
A cube as AutoCAD entity, a cube in iv format, and translated to iv-format, the
translator was not able to recognise the cube and translated it into a group
with an IndexedFaceSet.
(see also: "The Inventor Mentor", Addison Wesley, 1994)
Open Inventor is an object-oriented toolkit for developing interactive, 3D
graphics applications. In other words: You can include and link the program you
are writing with files from the Inventor library. Inventor is a toolkit for
programmers.
An advantage of using a toolkit like Inventor is that you do not have to write
low-level procedures for the graphics display. These have been written and
optimised by specialised programmers. Inventor also makes sure that you do not
have to know much about the architecture of the computer you are using. For
example you can call for texture mapping in your program, if your computer
cannot do texture mapping the program will nonetheless run, just without
drawing patterns.
For Inventor to know what to draw and how, a tree called Scenegraph is built
up. The nodes in this tree describe shapes, properties, and more. The
connections between the nodes define the path along which the program moves
while displaying the graphics.
The scenegraph starts with a top node, by convention called root. Inventor
loops through the tree by starting at root and after the last node has been
passed, restarting at root. The graph is traversed top to bottom, left to
right.
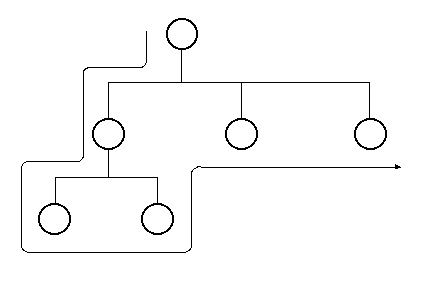
Top to bottom, left to right traversal of a scenegraph.
For simple, often used shapes, like cubes and spheres, there are predefined
shapes available. For a cube it then suffices to define the size of each of the
three extensions, For a sphere only the radius has to specified.
More complicated shapes have to be defined by the coordinates of the vertices
and how they have to be combined.
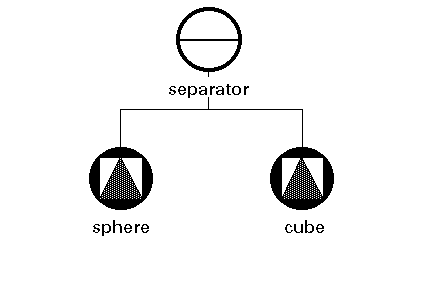
Scenegraph with a sphere shape node and a cube shape node.
Before a shape is drawn, certain properties can be defined. To define the color
the material's color has to be defined. To specify the position a translation
has to be applied. The properties have to be included as nodes before the shape
node so that they get read first in the traversing of the scenegraph.
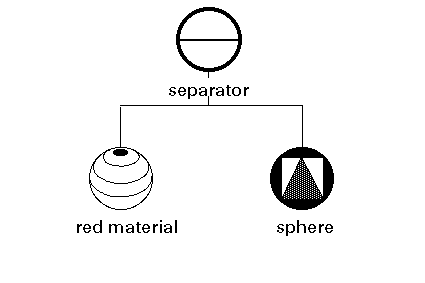
Scenegraph for a red sphere
A Separator node makes sure that anything underneath it is not applied to the
following nodes. If you are building a blue composition with a red part
somewhere, you can use a separator so that the red material is not applied to
the following shapes. Separators also help to make a Scenegraph more readable,
they are stetting a mark for a subgraph.
The top node is preferably a Separator, so that every time Inventor starts
drawing the Scenegraph, everything is reset to the defaults.
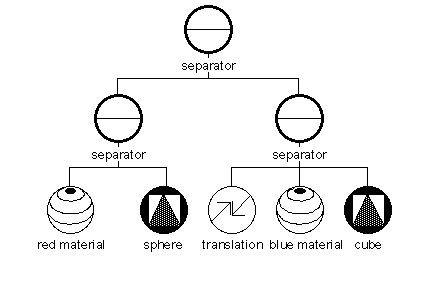
Scenegraph with separators, a red sphere, and a blue cube.
Programming languages can be grouped in procedural, symbolic, and object
oriented. In the following the characteristics and advantages of each group
will be explained.
In procedural language statements are executed in a well defined order, and the
types of variables are specified. Languages like Pascal, C, FORTRAN, are
examples. They are suited for tasks that involve well understood series of
operations, numerical instructions, and the necessity of maintaining precise
data types.
Symbolic languages, like LISP and AutoLISP, treat variables like symbols, which
can change their type during execution of the program. These languages are fine
for task that involve the manipulation of abstract concepts, associations
between them, and data sizes and types, which are not known in advance. For
these reasons much AI (Artificial Intelligence) programming is done with
symbolic languages.
Object oriented languages, like C++ and Smalltalk, are strongly typed, but not
procedural. The functions that are executed are called by the objects and will
influence other objects. These languages are good for describing parts and the
way they interact in a bottom up approach. Many graphics libraries are written
with an object oriented approach, because first the elements and their behavior
can be described and then the whole picture composed.
C++ is an object oriented language. An object is defined by its name, variables
and functions. For the use of C++ in combination with Inventor we can start
without defining our own objects and just make use of the ones made available
by Inventor. Lets start by looking at how to work with defined objects.
Before an object can be used it has to be initialised. A description of a type
of an object has to be assigned to a name. The C++ operator to use is called
new. The name of the node has to be looked up from the reference manual.
The variable name is preceded by an asterisk (*), which means it is a pointer
to an object, the pointer's value is an address in memory, at which the whole
object is stored.
Because pointers are a complex feature you should take this form of defining an
object as a convention and learn from the examples how to use the asterisk (*)
and also the arrow (->) to define and access the objects.
For a cube node this looks like this:
SoCube *mycube = new SoCube;
To define the dimensions of the cube, the variables for width, height and depth
have to be set. All these variables have default values, even if you do not
specify them something will be drawn. You can look up the defaults in the
reference manual. For example: SoCube has default of 2.0 for each dimension.
This is how the dimensions of the cube can be specified:
	mycube->width = 1.5;
	mycube->height = 2.7;
	mycube->depth = 2.1;
Some nodes do not allow the values to be set directly, they provide a function
to specify the values. An example is the SoTransform node. This node can do
many transformations and has to coordinate them, therefore setting values
implies the execution of some functions.
This is how a translation is defined:
	SoTransform *mytrans = new SoTransform;
	mytrans->translation.setValue(1.5, 2.1, 3.3);
Even though C++ is an object oriented language there is a procedural part to
it. A C++ program always starts by executing the function called main, where
the environment is initialised and the first objects created.
A C++ program will look very different then a AutoLISP program. These are some
of the new formalisms:
- every statement ends with: ;
- curly brackets are used to group code, i.e. a function or after an
if-condition {}
- functions have the variables in round brackets fun(var1, var2, ...)
- the type of a variable has to be defined int a, float b, ...
- comments can start after // until the end of the line //
- several lines of comments can be enclosed by /* */
Interpreting a program means to take each statement of the code and execute it
one at a time. Examples for interpreted languages are LISP, AutoLISP, and
Basic. Compiling a program means to translate the program into a lower level,
machine dependent language. The translation also optimises the program.
Examples for languages that have to be compiled are FORTRAN, Pascal, C, and
C++.
An advantage of a compiled program is that it will execute faster then an
uncompiled one, because it is optimised for the machine it runs on. The process
of compiling also includes the detection of certain errors, so called compile
time errors. These can then be corrected before running the program and the
number of remaining errors, runtime errors, reduced. A disadvantage is that the
code cannot be read anymore and one needs the help of a debugging program to
follow the execution of a compiled program.
As C++ application always has to be compiled. The followings things happen
during the process of compiling:
make is the command that starts the process defined in the file called
Makefile, what happens can roughly be described as: check - compile -
link.
- Are all the files and libraries, that have to be combined to one
application, specified in the Makefile, available?
- Which files have to be compiled so that they can be linked later?
- Compile each of them.
- Check if all the files called by this file are available.
- Check if there are no syntax errors.
- Check if all names of variables and functions are used correctly.
- Link the compiled files and the external libraries.
- Check if all functions are defined.
The first exercises will help you to get to know Inventor's structure of nodes
and their effects on the graphics. You will also look at a C++ program and
compile it.
Copy the files from ausgabe/exercise09 to
your exercise09 directory. The file HOWTO.Exercise9 holds the following instructions
and some hints.
The Goal of this exercise is to get acquainted with the way Inventor handles
and renders objects. Basically Inventor objects are stored in a hierarchical
structure that is called a scenegraph, the single components of this structure
are called nodes. Nodes are connected with paths. Some nodes have an influence
on others some do not, a node can only have an influence on the ones following
it though. There are basically three kinds of nodes which you are going to use,
nodes that group other nodes, nodes that influence other nodes and nodes that
protect other nodes from being influenced:
- open up Autocad
- run your program from exercise 5
- then export the house that it has created with the following command from
the menu:
- File->Export->Inventor->standard File
- and then
- "File->Export->Inventor->Edit Graph...
- close Autocad
What you will see now is the representation of
your house on the left-hand side and its scenegraph on the right-hand side.
Chose the arrow from the buttons on the right and double click on the different
nodes to either get information about them, or expand them. Then try to play
with the cut and paste commands. For example: Try to copy some of the nodes
hidden under the bottom nodes up under the top node. Also try to change some of
the values that appear when you double-click on a node.
- try to change color or position of single/all objects.
- create additional parts by using the geometry that you have exported from
acad and using the possibility of inserting new nodes from the "node"-menu.
- Save it in gview.iv (command in the gview menu) and close the viewer. Move
the gview.iv file into the exercise09 directory. Be careful (!!!) to always
rename the gview file. Because there is no "save as" command, iv files will
always be written out as gview.iv and overwrite any existing file with the same
name.
Hold down the right mouse button on the gview.iv-file and choose "edit" from
the menu that appears to get the text version of the file. The text will look
something like this:
	#Inventor V2.0 ascii
	Separator {
		....
		....
	}
Insert
the following just beneath the line containing the first Separator command:
	TransformSeparator {
		Rotor {
		    rotation	0 0 -1  4.25412
		    speed	0.1
		}
	Translation {
		   translation	30 30 70
		}
	PointLight { }
	}
Save
the file, close the editor, open a shell, cd to exercise09 and write "gview
gview.iv" to reopen gview and look at the components of the first node in the
graph and try to understand what it is doing.
How do you program a scenegraph with C++? It is fairly simple, first you have
to create a top node, in our exercises this will be a SoSeparator node, then
you add other nodes under this SoSeparator node. And finally you tell the
viewer, you are using, which scenegraph it should show.
Look at the files example.iv and example.c++ with the text editor, they both
create the same Scenegraph.
You can see the scene with the command: gview example.iv
To run the .c++ file you first have to compile it.
Either:
- double click on the Makefile-icon
- then double click the newly generated file example
or:
- cd yourdirectory/exercise09
- make example
- example
Please hand in an iv-file to ~prog/abgabe/exercise09/yourname09.iv.
And also a Makefile.log or Makedepend to
~prog/abgabe/exercise09yourname09.make.
This website has been archived and is no longer maintained.